
How to build an emergency shelter with no tent
When the weather turns and you have no tent, a shelter is not a comfort. It is the thing keeping you alive. Exposure kills faster than hunger or thirst: a cold, wet night in the open can drop your core temperature to a dangerous level in hours, and cold steals the clear thinking you need to save yourself. This guide covers building an emergency shelter with whatever you have, from a tarp and cord to nothing but the trees around you, and how to make it hold up in wind, rain, cold, and snow.
Every shelter does two jobs: it blocks the weather, and it holds your warmth. The second matters more than most people expect. You lose heat four ways, to the cold ground beneath you, to moving air, to rain and damp, and to the open sky overhead, and a good emergency shelter cuts all four. The single most important rule follows from this: build it small. A shelter must be just large enough to lie down in and no larger, because empty space is space your body has to heat. A shelter twice the size you need will leave you shivering all night.
When shelter becomes your first priority
In most survival situations, shelter outranks food and often water. Prolonged exposure to cold and wet causes exhaustion, and an exhausted person slides into a passive, defeated state that gets people killed. If you are lost or stranded and the light is fading, the temperature is dropping, or rain is coming, stop travelling and build. Give yourself a wide margin: it always takes longer than you think, and you want the roof over your head before dark and before you are shivering, not after.
Field tip
Start shelter at least two hours before dark or before bad weather arrives. Building in daylight with warm hands is a different task than building in the dark, wet and numb. If in doubt, stop early. You can always improve the shelter once you are safe under it.
Choose the site before you build
The right site does half the work. Before you commit, walk the ground and check for the things that make a shelter safe and warm:
- Level and just big enough to lie down. You want to sleep flat, not on a slope that slides you into a wall all night.
- Building material within reach. Deadfall, boughs, leaf litter, or standing trees the right distance apart. Carrying materials far is wasted energy you cannot spare.
- Out of the wind, with the shelter’s back to the prevailing weather. A natural windbreak, a bank, a boulder, dense trees, is worth a lot.
- Off the low ground. Cold air pools in ravines, valley bottoms, and creek beds at night, so they run several degrees colder and hold more insects and damp. A slight rise or bench is warmer.
- Above the water. Never camp below the high-water mark of a river or in a dry wash. A distant storm can send water down with no warning. Avoid the base of avalanche or rockslide slopes.
- Nothing overhead. Look up for dead limbs, leaning trees, and loose rock. A “widowmaker” branch that falls in the night can be fatal. Check the ground for snake, tick, and ant activity too.
With a tarp, poncho, or emergency blanket
If you carry a tarp, a rain poncho, or even a mylar emergency blanket, you can be under cover in minutes, which is exactly why one of these should live in your pack on every trip.
The fastest configuration is a lean-to: string a ridgeline of cord between two trees at about waist to chest height, drape the tarp over it (or tie one long edge along it), and stake the back edge to the ground so the sheet angles down into a roof. Face the open front away from the wind and toward a heat source if you have a fire. To shed rain better and trap more warmth, pitch it lower and steeper; for two sides of protection, fold it into an A-frame over the ridgeline and stake both edges down.
Tie a short drip stick , a twig lashed to the ridgeline cord just outside the shelter, so rainwater running along the cord drips off before it reaches you. In strong wind, drop the ridgeline to knee height and pitch the tarp close to the ground to cut the profile the wind can catch.
A blanket is a shelter
A featherweight mylar emergency blanket or bivy does two things at once: rigged overhead it blocks rain and wind, and its reflective surface bounces your body heat and the heat of a fire back at you. It weighs almost nothing and belongs in every day pack. It is a stopgap, not a sleeping bag, but on a bad night it buys you hours.
Natural shelters, the fastest option
Do not overlook what the landscape already offers. The quickest shelter is one you barely have to build. A shallow cave or rock overhang, a dense stand of low evergreen boughs, the leeward side of a large boulder or fallen log, or a big tree with limbs to the ground can all cut wind and rain immediately. Improve them by piling boughs or debris across the open side and insulating the floor.
Two cautions. Check any cave or crevice for animals, snakes, and insects before you crawl in, and never light a fire deep inside an enclosed space. Smoke and carbon monoxide have no way out. And avoid the temptation to shelter in the very lowest, most sheltered-looking hollow; those cold sinks are colder than the ground a few meters up.
The debris hut: warmth from nothing but leaves
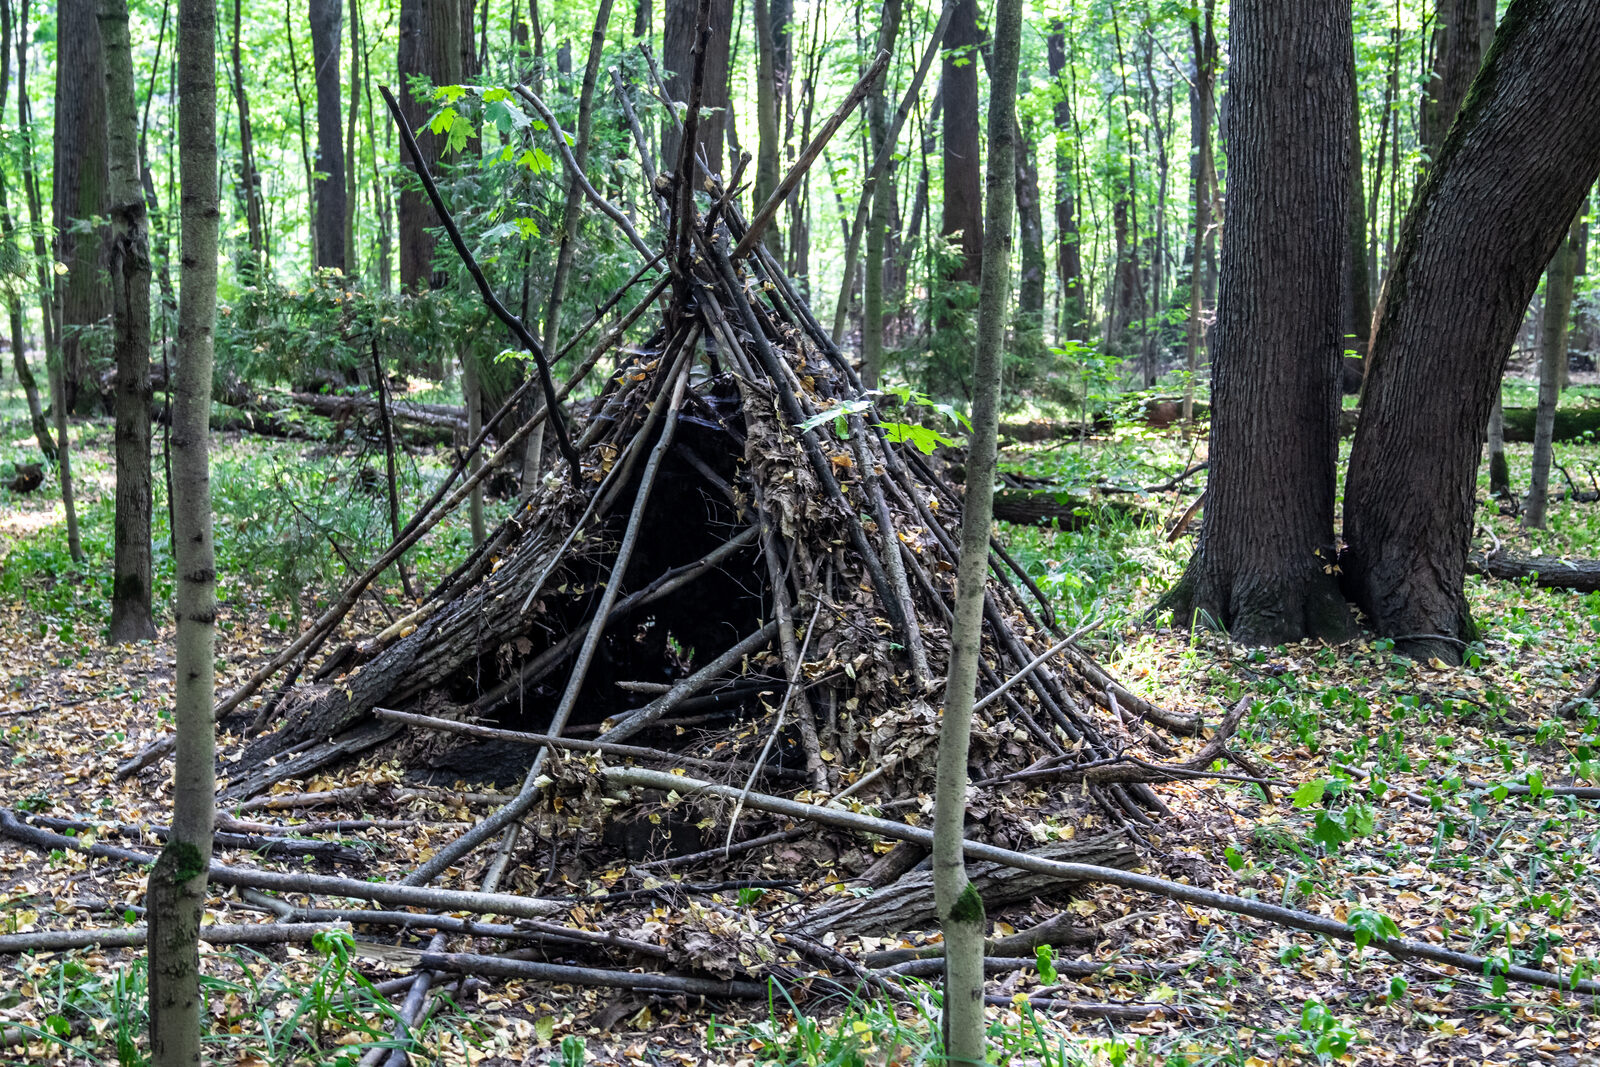
When you have no tarp and the night will be cold, the debris hut is the shelter to build. It needs no tools, no cord, and nothing but dead wood and leaf litter, and because it packs a thick insulating layer all around you, it is one of the warmest shelters you can make by hand.
To build one:
- Set the ridgepole. Find one sturdy pole a little longer than your height. Prop one end on a low stump, rock, or the fork of two short crossed stakes at about hip height, and rest the other end on the ground. This is the spine of the hut.
- Rib it. Lean shorter sticks along both sides of the ridgepole like the ribs of a boat, close together, making a low wedge just wide and long enough to wriggle into. Keep it snug. Remember, small holds heat.
- Lattice it. Lay finer sticks and brush crosswise over the ribs so your insulation cannot fall through into the sleeping space.
- Pile on debris. Heap dry leaves, pine needles, grass, moss, and forest litter over the whole frame until the layer is at least an arm’s length thick, a meter (three feet) or more. Thicker is warmer. In rain, the more you pile on, the drier you stay.
- Stuff the inside. Fill the sleeping space loosely with the same dry material, then burrow into it. You want insulation under you and around you, not just overhead.
Plug the entrance behind you with a pack, a bundle of debris, or more leaves once you are in. Done well, a debris hut keeps you warm with no fire at all.
The field-expedient lean-to
In a wooded area with more time or a group, a natural-material lean-to gives you a sturdy roof and pairs well with a fire out front. Lash a horizontal support pole between two trees about two meters (seven feet) apart at waist-to-chest height. Lean a row of poles from the ground up against it as rafters, with the back into the wind. Crisscross saplings across the rafters, then shingle the whole roof with boughs, bark, leaves, or grass working from the bottom up so each layer sheds water over the one below. Pile bedding inside.
A lean-to is open on the warm side, so it relies on a fire reflector to be comfortable in cold weather: a low wall of stacked green logs or stones on the far side of your fire throws heat back into the shelter instead of letting it radiate away. Learning to build a fire in any conditions turns a lean-to from a rain roof into a warm one.
Insulate from the ground. Always
This is the step people skip, and it is the one that ruins nights. At rest you lose as much as 80 percent of your body heat straight into the ground you are lying on. The cold soil wicks warmth out of you far faster than the night air. A roof over your head does little if your back is on bare earth.
Before you lie down, build a mattress: pile a thick, springy layer of dry leaves, pine boughs, grass, moss, or your empty pack between you and the ground. Compress it and it should still be several inches thick. If you carry one, a closed-cell foam pad does this job perfectly and cannot fail; our Therm-a-Rest Z Lite Sol review covers the one we trust because it has nothing to puncture. In an emergency, sit or lie on your pack, your rope, or anything that breaks contact with the cold ground.
Ground contact is the hidden killer
Many people who build a good roof still get dangerously cold because they lie directly on the earth. Never sleep on bare ground in the cold. Get a thick insulating layer underneath you first. It matters more than the walls.
Rain, wind, cold, and snow
Rain. Pitch steeper so water runs off fast, shingle natural roofing bottom-to-top, and dig a shallow trench around the uphill side to divert runoff away from your floor. Keep your insulation and yourself off the wet ground.
Wind. Put the solid back of the shelter into the prevailing wind, drop the profile low, and use a natural windbreak. Wind strips warmth off you far faster than still air of the same temperature, so blocking it is as valuable as blocking rain.
Cold. Go smaller and add insulation everywhere, thicker debris, more bedding, a reflector wall and fire if you can. Cover your head and neck; you lose a large share of body heat from an uncovered head. Keep your clothing dry, because damp clothing loses most of its insulating value.
Snow. Snow is a good insulator, piled around a lean-to or packed into a mound and hollowed out, it blocks wind and holds warmth. But never lie directly on snow; build a thick bough platform first. If you enclose any shelter and run a flame inside for warmth, you must ventilate it.
Ventilate any enclosed shelter with a flame
A candle, stove, or fire inside a closed snow cave or debris shelter can produce carbon monoxide, colorless, odorless, and deadly, often with no warning. Always keep a ventilation opening, and never fall asleep with an open flame burning inside.
Common mistakes, and how to recover
- Building too big. The most common error. A roomy shelter never warms up. Rebuild the walls in tight around you, or stuff the extra space with debris.
- No ground insulation. Cold from below ruins the night. Add a thick bough or leaf mattress even if it means a late scramble.
- Starting too late. Building cold, wet, and in the dark goes badly. Commit to shelter early, while you still have light and dexterity.
- Roof leaks. Thin debris drips through. Pile on far more than looks necessary and pitch the roof steeper.
- Sited in a cold sink or a drainage. If you wake up freezing in a hollow or hear water rising, move to slightly higher, drier ground.
What to carry so you are never without shelter
You can build with nothing, but a few grams of gear turn an ordeal into a routine night out. Carry at least an emergency blanket or bivy and a few meters of cord on every trip, all season.
- An emergency bivy or mylar blanket , reflective, windproof, waterproof, and nearly weightless. The single highest-value shelter item for a day pack.
- A compact tarp or rain poncho plus 15 m (50 ft) of cord , a full roof in minutes and the backbone of a lean-to or A-frame.
- A closed-cell foam sleeping pad , the reliable fix for ground-cold; see our Therm-a-Rest Z Lite Sol review.
- A fire-starting kit , warmth, drying, and morale. A ferro rod works soaked and frozen; pair it with a wet-weather tinder and read how to start a fire in any conditions.
- A headlamp . Building after dark is far easier with hands-free light; see our Black Diamond Spot 400 review.
See the ferro rod we recommend
Key takeaways
Decide to build early, while you have light and warm hands. Pick a level, sheltered site off the low ground with nothing dead overhead. Use what you have, a tarp lean-to in minutes, a natural overlook, or a hand-built debris hut when the night is cold, and keep it small so your body can heat it. Above all, insulate yourself from the ground, block the wind, and shed the rain. Practice pitching a tarp and raking up a debris bed in your backyard once, and the real thing in bad weather will feel like a task you have already done.
Adapted in part from the U.S. Army Survival Field Manual (FM 3-05.70 / FM 21-76), Chapter 5, “Shelters,” and Chapter 15, “Cold Weather Survival,” with modern civilian Leave No Trace practice. Conflict- and evasion-specific material is omitted.
Wilderness Experts is reader-supported. As an Amazon Associate we earn from qualifying purchases; when you buy through links on our site we may earn a commission at no extra cost to you. It never changes what we recommend.